 |
|
|
|
The Strobe GhostHere's
Usually, I display the ghosts in a field beside my house in a somewhat 'random' display. Sometimes I change their position from day to day to worry the neighbors. I've been told it looks like a whole army of ghosts moving across the field! It's not a particularly scary effect, but everyone stands and stares, and it has stopped traffic.... Ok, here's how you build it! Parts needed The ghost is constructed from the following materials: (substitute where you need to!):
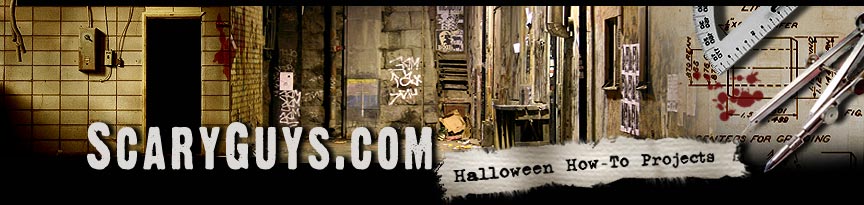
The Ghost Face
Use scissors to cut the pie plate in half. Cut eye holes in one half, then assemble the halves back-to-back using clear tape. Hopefully, the drawing will give you the idea. The Ghost Arms
Bend the 6 foot length of 12 gauge wire into a rough arm shape. Loop the ends. Add a 6"-8" loop in the middle. This is used to attach the arms to the ghost face. At first, roughly follow the drawing. The Ghost PostAssemble the electrical parts of the ghost. Attach the socket to the
top Use electrical tape to attach the wire to the stake along its length. Be sure to leave about a foot of the bottom of the stake free so it can be driven into the ground. Use the drawing on the first page above as a guide. Assemble the GhostFind some sturdy way to hold the entire electrical assembly upright while
you assemble the other parts. Attach the arms to the ghost face by taping
the top couple of inches of the arm center loop to the inside bottom of
the back pie plate half (clear as mud?). Screw in the strobe. Put the
ghost face and arm assembly over the strobe. Does it look like a ghost yet? Using the nylon cord, gather the plastic sheet between the face and the top of the arms and around the socket. You may want to cut a couple of small holes to feed the cord through in front to avoid gathering the plastic too much around the neck area. This makes for a smoother looking face. Loosely tie the cord. Use your judgment how small a loop of cord to use. The idea is to give a bit of shape to the head and neck of the ghost, and to hold the two assemblies together. At the ends of the arms, attach the plastic sheet to the the loop in the wire. You can either twist the wire around the plastic, or use tape. This will keep the wind from blowing the plastic off the ends of the wire. Stake Him!Go out into the yard, and either push the stake into the ground, or loosen the pipe clamp (to avoid damaging the strobe assembly), then pound the stake in with a hammer. Reassemble when the stake is firmly in the ground. Connect an extension cord, and plug it in! After dark, you can adjust the flash rate. I prefer the slowest repeating rate. When several ghosts are used together, from a distance it looks like the ghosts are moving! Betcha can't build just one!It's easy to arrange several of the strobe ghosts in patterns around a yard, or in a field. My preference is to arrange them in groups of three or four spread somewhat in a line, as if they are moving towards a destination. GLARE ALERT!The strobes themselves are a bit bright. If the ghosts are viewed from less than 20 feet, you can use a piece of white cloth, or a sock around the strobe lens to soften the flash. VariationsI've also used neon flicker bulbs instead of a strobe to light the ghost. This works great for close distances. You may need to use two flicker bulbs to get enough brightness. Just double up on the sockets! I used a 10 foot piece of 1" PVC pipe to 'fly' a couple of the ghosts. Paint the pipe flat black. Drive a 2'-3' piece of concrete reinforcing bar (rebar) into the ground to securely hold one end. Slide the ghost stake into one end of the PVC pipe. Secure the stake to the pipe with tape. Then slide the other end of the pipe over the rebar. Poof! Instant flying ghost! But watch out! The wind may cause the ghost to fly around a bit too much. If so, reinforce the PVC by inserting a piece of 1/2" PVC inside it. This lets the entire pole remain flexible. If it is still too flexible, you may need to extend the length of rebar a few feet to stiffen the pole. If it's just too windy, use a shorter pole... To put the strobe ghost where you can't drill or pound a hole, build up a base using 1/2" plywood securely screwed to a 1 foot tall 4" by 4" post. Drill a hole in the post to take the strobe ghost stake. If the base is just resting on a surface, the plywood may need to be quite large to overcome the wind blowing on the ghost. It's best to find a way to firmly attach the base, either with straps or screws. I did have a ghost 'fly' across my deck one time - it terrified the dogs... ==================== Here's a tip from Shelly in PA: ==================== Dave Jarman shared his ideas on building and hanging(!)
the Strobe Ghost :
In Closing...As I've said before, the strobe ghost is one of my favorite decorations. It's simple, cheap, and impressive. The effect is even more impressive when you build up several of them. Over the years I've put them in the woods, in fields, my yard, on top of the house, deck, garage, shop - one even found its way into my car! Don't be afraid to experiment. If you discover new ways to use the strobe ghost, please let me know. And if you have any questions about the design or construction, send an email, I'll try to help. I hope you enjoy it!
NOTE:
Before using any information here, Copyright
© 1995-2008 Myth Adventures, Inc.
|
|
|
|
 one of my favorite Halloween decorations,
The Strobe Ghost. It's easy to build, and when used in groups, it makes
for a very impressive display. Over the past years, I've added a few each
year. I was surprised to discover that I now have 23 of them!
one of my favorite Halloween decorations,
The Strobe Ghost. It's easy to build, and when used in groups, it makes
for a very impressive display. Over the past years, I've added a few each
year. I was surprised to discover that I now have 23 of them!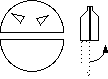
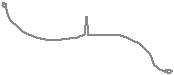
 of the post using the pipe clamp. Be careful not to
over tighten, as it will warp the socket threads. Strip the ends of the
zip cord, then attach the wire to the socket using the wire nuts, then
put the plug onto the other end. If you want, you can test the electrical
connections by screwing in the strobe, and plugging it in. But after you're
done, put the strobe back in the box. No sense dropping it now! Oh yeah,
keep the strobe box. It's handy to use to store the strobe when its not
Halloween!
of the post using the pipe clamp. Be careful not to
over tighten, as it will warp the socket threads. Strip the ends of the
zip cord, then attach the wire to the socket using the wire nuts, then
put the plug onto the other end. If you want, you can test the electrical
connections by screwing in the strobe, and plugging it in. But after you're
done, put the strobe back in the box. No sense dropping it now! Oh yeah,
keep the strobe box. It's handy to use to store the strobe when its not
Halloween!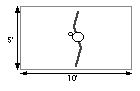 A rough fit is Ok for now. Cut a large 5' by 10' clear
plastic sheet, then drape it over the entire assembly. A top view is shown
here...
A rough fit is Ok for now. Cut a large 5' by 10' clear
plastic sheet, then drape it over the entire assembly. A top view is shown
here...