 |
|||||||||||||||
|
|
Automating Your PropAs with pneumatics, the electronics that automates a prop seems complicated, expensive, and somewhat dangerous. And, as with pneumatics, there are a few parts needed to automate a prop that come in all kinds of shapes, sizes and prices to fit any number of applications. Automating your prop consists of three main classes of parts:
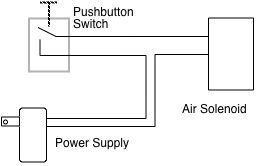
Manual TriggerThe simplest way to automate your prop is add a manual switch to supply power to your air solenoid. Most often, pressing a switch activates the prop, releasing the switch returns to prop to its idle position. The connections (or 'circuit' in electronics-speak) look something like this:
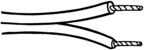
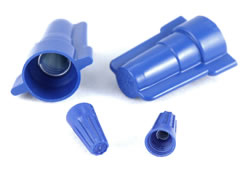
Wiring up a manual trigger is straight forward. I like using 18 guage 'zip cord' for wiring up trigger circuits. This is the kind of wire normally used in speaker and appliance cords. (note - avoid the clear insulation for power applications, this kind of wire is for speakers, and is not designed for power use). A good source for zip cord, and other electronic parts is All Electronics. A handy way to connect the wire ends is with wire nuts. This is a plastic twist-on connector that fits over the ends of the bare wires and holds them together. (they come in lots of shapes and colors, too)
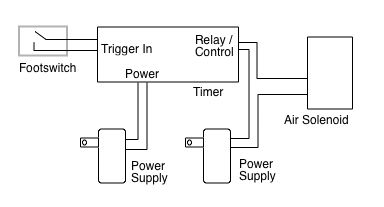
Automatic TriggersMoving past manual triggers (switches), are those triggers used to start timers. This kind of trigger usually detects motion, either by someone stepping on a footswitch, passing through a light beam, or by detecting the heat a person gives off as they move past a sensor. At the simplest, the circuit looks like this:
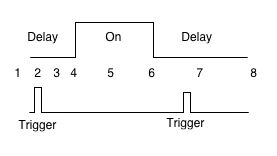
To use a beam breaker or motion detector instead of a footswitch, replace the footswitch with the trigger of choice. Beam breakers and motion detectors may require their own power supply as well. (yes, eventually you will have lots of power supplies - its a good idea to standardize your power needs. The best Ive found is 12 VDC, but I still have many 9 VDC and 24 VDC power supplies in use!) Generally, timers have at least three sets of connections: a power connection to run the timer itself; a connection for the trigger input (that may or may not need power itself!); and a third connection to power the solenoid (or other device). So why go to all this trouble just for a timer? In a word, flexibility. A timer lets you adjust all aspects of prop timing. For example, if your trigger (lets say its a motion detector) can only be placed in one spot conveniently, but its not in the best place to immediately trigger the prop. The timer lets you set an initial delay between the time the trigger detects motion and when the prop actually moves. The timer then keeps the prop energized until its completed its motion, shuts off, and can be set to remain off so the prop cant be immediately re-triggered. The sequence is something like this:
Note that during the exit delay, folks cant go "lets do that again", and "again", and "again"... ;-) Some timers, like Evilusions Timers, let you turn the prop on and off as many times as you want in step 5, giving lots of flexibility how the prop moves.
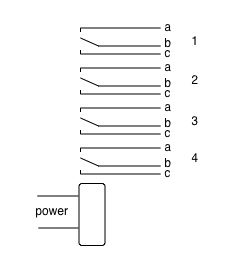
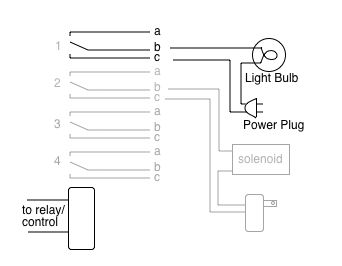
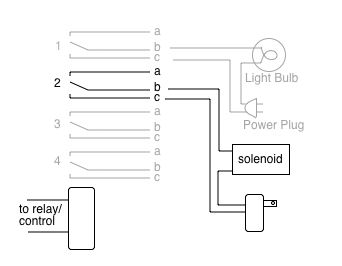
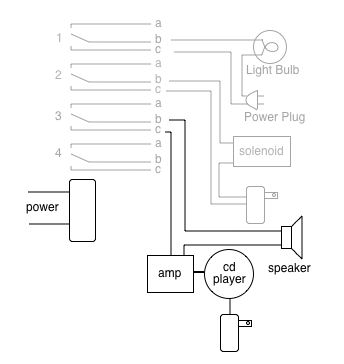
Adding Sound, Lights, and Other EffectsNow that you have your prop hopping, you'll want to make it scream, flash, and blow fog! Triggering sound, lights, and special effects at the same time as the prop is a bit more involved (unless you can afford the really cool Gilderfluke timer/sound thingies - $250 & up!). But it's really no more than setting off the sound trigger at the same time as the prop. Finding a sound source that starts every time a button is pressed is not an easy task. Evilusions has a sound playback unit in a box that replays your saved sound from the start each time you trigger it. (Gee, you'd think I really liked these products... well, I do - and Im not paid to say that - just happy with the products and customer service) In general, the easiest way to add special effects to animation (sound, lights, other effects) is to add a relay to the output of the timer so that it can trigger multiple effects without needing to worry about matching all the power supplies. The most useful relay Ive found is what's called a four pole, double throw - or 4PDT for short.
This is a lot of wires to keep track of. I'd recommend getting some masking tape and wrapping a bit of it around each wire like a little flag. Write the connection identification on the tape. This will help to keep up with which wire goes where as you build up the connections. This is just a basic starting place to begin automating your prop. It can get way more involved!
NOTE:
Before using any information here, Copyright
© 1995-2008 Myth Adventures, Inc.
|
||||||||||||||
|
|
|||||||||||||||