|
|
Swamp Thang Plans
NOTE:
BUILD THIS PROP AT YOUR OWN RISK!
I do not accept any responsibility as to the fitness of these plans
for any purpose.
There, you're on your own!
!! BE CAREFUL !!
This prop is big enough to hurt you, your dog,
cow, kids, friends, neighbors, or car if if falls!
BE CAREFUL ! (did I say that before?)
This took about $60 and a half day to build. Its a really simple prop.
Its size is what makes it imposing! None of these measurements are critical.
I built my first Swamp Thang out of lumber stored from other building
projects.... Experiment! If something works well, let me know
how it worked!
To build this prop you need:
- 2 - 16' 2x4
- 2 - 14' 2x4
- 5 - 8' 2x4
- 4 - 2x4 stakes about 3' long
- A 3' x 3' square piece of 3/8" or thicker plywood
- 2 - light sockets ( with a way to mount to a piece of plywood)
- 2 - 25watt blue lightbulbs (or any other color, for that matter)
- 2 - 10 ft of 3/4" PVC or PEMT (plastic electrical conduit)
- 1- 3/4" coupling
- 6 - 3" lag bolts
- 4 - 5" lag bolts
- 4 - large washers (to fit the 5" lag bolts)
- 4 ft. of chicken wire
- 30 ft. of 18 ga. wire
- 1 - 2 prong plug
- 50 ft of nylon rope
- Duct Tape (hey, this is a professional job!)
- Several 1.5" wood screws (or galvanized drywall screws - my favorite!)
- 1 - 100' x 10' roll of (cheap) black plastic (you don't need the entire
roll, just about 60' or so, but that's the best way to buy it)
- Highly recommend getting two sawhorses to support the arms during
assembly. This makes placing and cutting the plastic very easy!
- Staples and staple gun (to attach the plastic), a drill and bit (to
drill holes for the lag bolts), scroll saw (to cut out the head), wire
nuts, wrenches (for the lag bolts), a few nails, small wood screws,
glue, a ladder...
Construction
Swamp Thang is built in two subassemblies: The Body and The Arms. I recommend
building the body first and setting it up to get a feel for the size of
the thing. Build and put the arms on later...
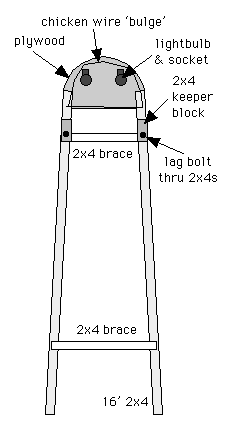
Front View showing the Rear Legs and Head Assembly
Body Assembly
Rear Legs
First, cut out the head from the piece of plywood. Draw a semicircle from
one side to the other across the top third, then cut it out.
Place the 16' 2x4 on the ground so that the plywood rests on the top,
and the bottom of the 2x4s area about 4 feet apart. These are the rear
legs. Use the wood/drywall screws to attach the plywood top to the 2x4s.
About 2' down from the top of the 2x4s measure a 2x4 to fit across both
rear legs as a brace. Cut off any excess.
Place another brace about 3' - 4' up from the bottom of the rear legs,
and cut off any excess. Attach the brace to the rear legs using 3"
lag bolts.
Using the scrap 2x4, cut 2 - 8" pieces. Place each piece on top of
the leg vertically, aligning the bottom of the piece with the bottom of
the brace. (This forms a 'notch' for the arm assembly) Attach with a 5"
lag bolt and washer. Assemble the other side
Oops! I almost forgot! NOT SHOWN in the drawings is a diagonal brace
running from the 'armpit' of one side to the opposite side bottom brace.
This diagonal adds a tremendous amount of strength to the prop!
Eyes
Attach the light sockets to the plywood, spaced to resemble eyes. Attach
the sockets to the wire and fit a plug on the other end of the wire. Let
the wire hang for now. You can screw in the light bulbs and test the lights.
Staple the chicken wire around the top of the head to form a 'bulge'.
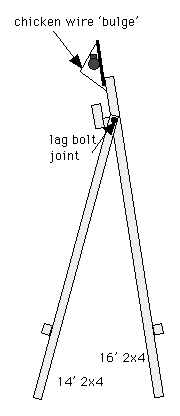
Side View showing Front Legs attachment
Front Legs
Place the 14' 2x4s along each side of the 16' rear legs, so that the bottoms
align. The tops of the 14' 2x4 (the front legs) should overlap the outside
of the arm notch formed by the top brace and other 2x4s. Attach the front
legs using the 5" lag bolts and washers. About 3' from the bottom
of the front legs, attach a 2x4 bottom brace using the remaining 3"
lag bolts
Oops! I almost forgot! NOT SHOWN in the drawings is a diagonal brace
running from the 'armpit' of one side to the opposite side bottom brace
in the opposite direction from the diagonal on the back legs. This diagonal
adds a tremendous amount of strength to the prop!
Stakes
Make up 4 - 3 foot 2x4 stakes by cutting a point on an end of a 3 ft length
of 2x4. Drill a 1" hole about 8" to 1' from the top to run the
rope through. Cut 5 or 6 - 3 ft lengths of nylon rope.
Drill a 1" hole about 2 ft from the bottom of each leg to run the
rope through.
You should now have a completed body!
Moving the Body
Use a short length of nylon rope to hold the bottom of the legs together
when you move it. Pick up one side near the head end, and find the balance
point. The body is awkward, but not really heavy. BE CAREFUL!
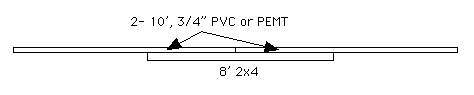
Arms showing the pipe and 2x4 assembly
The Arms
Connect both pieces of PVC (or PEMT) pipe together using the coupling.
Set an 8 ft 2x4 on edge in the sawhorse legs (see, it did come in handy!).
Drill a 1" hole in the center of the 2x4 (for the nylon rope, to
be done later). Place the pipe on top centered on the 2x4. Use duct tape
to hold the pipe on top of the 2x4 while you secure it. Drill two holes
about 2 ft in from each end of the 2x4, then secure the pipe with the
remaining 3" lag bolts and washers.
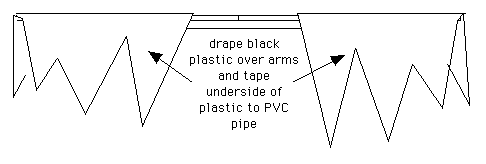
Arms showing plastic covering
Cover the arms with black plastic by pulling out 2 - 8' pieces and unfolding
the plastic, then fold it in half. Drape the plastic over the pipe with
one end just covering the end of the pipe. Secure the plastic to the pipe
using duct tape attached to the bottom inside of the plastic sheet and
the pipe. Experiment. Use the cutter supplied with the roll of plastic
to cut zig-zags like bat wings. Assemble the other side the same way.
This completes the arms...
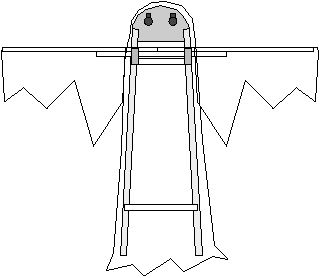
Front View showing plastic outlined on assembled prop
Setup the Body
Take the whole affair outside and find a level spot in the yard (do not
attempt to try this on pavement! It will slide away from you!). Drive
two stakes in the ground about a foot deep (for testing only!). Tie the
back two legs to the stakes to act as an anchor. Use a sawhorse leg to
lift the head end off the ground a couple of feet. Attach the arms by
centering, then pushing the arm into the 2x4 brace. You may need to hammer
it in. A snug fit is good! Unroll and unfold the black plastic on the
ground under the body. Bring the plastic up and over the head (between
the sawhorse and body, uh huh...). Staple an end of the black plastic
to the top brace, leaving a bit hanging 'below' the brace for the 'collar'.
Use the plastic cutter to make the 'collar' jagged. Cut off the bottom
of the plastic about 3 ft beyond the legs. This allows for 'feet'. Unroll
and unfold another length of plastic up to the neck, and staple to the
arms. Again, cut the plastic at the bottom about 3 ft beyond the end.
Staple, fold, and cut the plastic to shape around the head and arms. DO
NOT proceed further down the body. It needs to be setup before continuing.
The body can be set up by standing in front of the body, lifting the front
leg brace, and CAREFULLY pulling the body vertical. As the body rises,
put the front legs on the ground. Then lift the front legs and space them
out until the entire body is balanced. Drive two stakes in the ground
beside the front legs and tie the legs to the stakes.
Index
NOTE:
Before using any information here,
please read our Disclaimer.

Copyright
© 1995-2008 Myth Adventures, Inc.
All Rights Reserved
|