 |
|||||||||
|
|
The Cheap Stone Wall - Pt. 2(Also check out ideas and variations on the Stone Walls from ScaryGuys across the Haunted Web!) As an alternative to the first cheap stone wall method, another way to build up a stone facade is using foam board to make blocks...
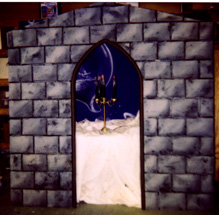
 A pic of a Crypt facade that I'm building Materials:
The Process:Decide on the size of your blocks. Changing the size, shape, and finish of the blocks determine the kind of wall you want to build. The chart below shows some options:
Make the BlocksOnce you have the size in mind, you can proceed to cut out the blocks from the foam board. This is a messy process, best done on a dropcloth in your garage, basement or outside on the sidewalk. Using a sharp knife, ruler and straightedge, layout and cut the basic block shapes. Take your time, and do not be concerned that the edges are not exactly straight. If you are using one of the smooth finish foam boards (blue or pink) you will need to remove the thin plastic sheet that covers both sides. This is a sealer for the insulation, but must be removed to do the finishing and painting steps. After you have all the blocks cut out, use a piece of 60 grit (very coarse) sandpaper to rough up one side of the block. This gives you the look of rock, stone, or brick. You will need to experiement to get the finish you want. Depending on which material you are trying to simulate, you may only need to lightly brush the surface for smooth brick or concrete block, or really gouge out small pieces of the surface for weathered granite or rough stone. There are lots of variations, and experimentation is best way to determine the look you want. Here's a couple of really bad photos of a blocks after sanding. (sorry, it just didn't come out very well). Maybe you can get an idea of the finish (but, maybe not...). Anyway...
 
Cut out the supporting shape for your wall from plywood, and place the blocks arranged like the finished wall. Here you may need to cut some of the blocks in half to give a staggered row appearance (see the crypt picture above). Its just as easy to cut the blocks now rather than earlier so you don't have too many left over. Once the blocks are laid out, you can use either hot glue, silicone caulk, foam board glue, or even small nails or screws to attach the blocks to the wall. Be sure to leave spaces for the mortar joints. A small piece of thin (1/4"-3/8") plywood makes a handy spacer to place between the blocks while you're attaching them to the support surface. Finishing the WallTo finish the wall, a fast method is to apply two different colors of paint, a base color and an accent color. First you apply the base color (usually the lighter color). I like to use a paint roller to apply the base color - its faster! Cover the entire wall, including the spaces. You may need to use a brush to get into all the spaces. Don't wait before applying the accent color. Get a small container and pour in the accent color. Get just enough paint on the brush to spread onto the blocks and mix in with the lighter base color. This mixing smooths the transition between the lighter and darker colors and adds 'depth' the finish. Its ok for the brush to pick up the lighter color as you paint. Just wipe off the excess as you go along. Don't forget to brush in some accent color into the spaces between the blocks to add a bit of depth there. Tip: You can even sprinkle on some mortar mix onto the wet paint to add more realism to the rock, or sprinkle morter into just the joints (spaces) between the blocks to enhance the look of real mortar. That's all there is to it. This is a great way to build up a light, durable wall that really looks great! As always, I love to hear from those of you who build my projects, and especially any ideas you discover along the way.
NOTE:
Before using any information here, Copyright
© 1995-2008 Myth
Adventures, Inc.
|
||||||||
|
|
|||||||||