Hockey Mask Guy Plans
The hockey mask guy is a simple, rugged prop. Basically he consists of
a 2x4 frame, chicken wire filler, a styrofoam wig head, green coveralls,
some wire, a really big knife, and of course the mask. To build him you
need:
- 4 to 6 - 8' 2x4s
- scrap plywood pieces
- old coveralls
- a wig head
- black cloth (about 2 feet square)
- a hockey mask
- a really big knife (or other desired implement)
- 6 feet of 12 (or 14) guage wire
- screws, lag bolts, glue (or caulk), staples, woodworking tools
The Frame
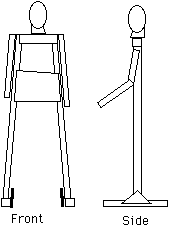
Cut two 2x4s to the height you want the prop. I cut mine to about 6 feet
(hey, he's a big guy!). Cut another piece of 2x4 to the width of the shoulders,
about 2 feet. Much larger and you won't be able to fit the coveralls over
him. Cut two more pieces of 2x4 about 2 feet long. The make the 'feet'
that keep him upright. You may want to make feet that fit into shoes,
but my intent was to hide the feet wherever I placed him. Anyway, I made
one arm straight, and the other angled. The straight arm is a piece of
2x4 about 3 feet long. The angled arm consists of two pieces of 2x4 each
about 1.5 feet long. Cut one end of each piece at a slight angle. This
makes the elbow bend. I used 1/4" lag bolts to secure the arm together,
but long screws will work, too.
Shaping the Body
 Assemble the legs and shoulders with 1/4" lag bolts (or long screws).
Do not put the arms or 'feet' on yet. Use screws to attach a piece of
scrap plywood as a brace between the legs at about the belly level. Using
chicken wire, form a basic body shape around the shoulders, chest, belly
and arms. There are several ways to do this, either by making a cylinder
of chicken wire or by making an arch then attaching the wire to the 2x4s
with screws or staples. Any method that works for you is the right one! Assemble the legs and shoulders with 1/4" lag bolts (or long screws).
Do not put the arms or 'feet' on yet. Use screws to attach a piece of
scrap plywood as a brace between the legs at about the belly level. Using
chicken wire, form a basic body shape around the shoulders, chest, belly
and arms. There are several ways to do this, either by making a cylinder
of chicken wire or by making an arch then attaching the wire to the 2x4s
with screws or staples. Any method that works for you is the right one!
Once you have the legs and shoulders together, slip on the coveralls.
This may take a while, so go slow. After the coveralls are on, slip the
arms in through the sleeves, then attach them to the shoulders with lag
bolts or screws.
Next attach the 'feet' by screwing on a 2 foot piece of 2x4 to the bottom
of each leg. Add a scrap piece of plywood as a brace to keep the entire
prop from falling.
I attached the wig head by first putting at 1/4" lag bolt into the
shoulders to act as a post. Then I used a generous amount of silicone
caulk to fill the hole in the neck of the wig head. The head was pushed
onto the lag bolt. Note: you can use hot glue, too!
Use a piece of black cloth to cover the head and neck, and either staple
or tack on with hot glue.
Then, add the mask! Tilting the mask to one side makes him look creepier....
The Hands
Make the hands out of some 12 or 14 guage electrical wire. Cut a piece
about 3 feet long. Be sure to leave about a 6" 'wrist' to attach
to the end of the arm. Use your hand as a guide to shape the fingers.
A rough approximation is great! After you get the fingers bent, attach
the wired ends to the 2x4 arm. I slipped on a worn-out pair of work gloves.
This gives you a bendable hand to pose as you want.
NOTE: If you want to add the really big knife, add another loop of wire
attached to the 2x4 specifically fitted to hold the knife (or desired
implement of destruction). The wire hand doesn't have alot of power to
hold implements.
Scare Somebody!
I have put him beside the driveway, on the deck, in the garage, even
on top of the roof. He has survived rain, wind, sleet, snow and ice. Remember,
if he gets wet, be sure he dries out before he is stored!
That's it! You know have a posable, durable prop to scare trick-or-treaters,
dogs, and delivery persons! Enjoy!
Index
NOTE:
Before using any information here,
please read our Disclaimer.

Copyright
© 1995-2008 Myth Adventures, Inc.
All Rights Reserved
|

