|
|
BigMouth
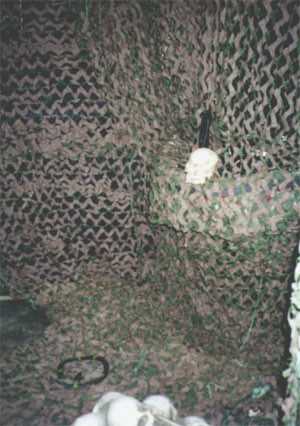
You're walking down a dark path, and come upon an area covered with camo
net. On one wall looks like a table with a skull perched on the edge.
Just camo net hanging everywhere. Not much to look at, then suddenly....
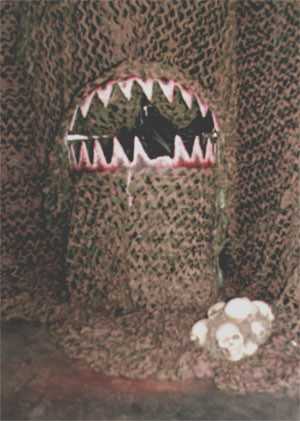
The table becomes a huge toothy mouth and it leaps out at you with a loud
roar!
One of my favorite scares for the past couple of years is BigMouth. Its
simple to build and very rugged. And, best of all, it's simple to make,
and it really knocks victims off their feet!
|
|
|
|
Its just a table, right?
|
NOT!
|
Parts
- 2 - 10' x 15' sections of camo net (can substitute most any cloth
or cloth mesh)
- 1 - 4' x 4' piece of 1/4" luan or plywood (luan is wood sheet
used for door facings)
- 1 - 8' 2x2 or 2x4
- 20' of 3/4" PVC pipe (recommend shedule 40, but the heavier
schedule 80 will work also)
- 1' of 1/2" PVC pipe
- 3/4" x 1/2" PVC reducer
- PVC primer and cement
- Sandpaper
- assorted 3/4" tees, caps, ells, forty-fives, and cross-tee
fittings
- 1 - 1/2" cap
- 30' of black rope
- 1 1/4" sheet rock screws (or whatever screws are handy)
- several 16 guage electrical wire nuts (to cover the sharp ends of
the screws)
- Power scroll/skil saw, screwdrivers, assorted tools
Assembly
|
|
Cutting Your Teeth
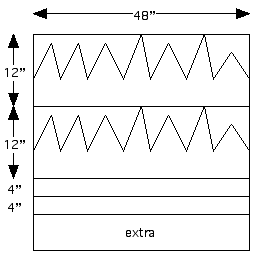
Cut out the luan piece to make two sets of teeth and two attaching
strips. First cut out two 12" strips, then two 4" strips.
Draw a pattern for the teeth on one 12" piece. When drawing
the teeth pattern, leave about a 6" strip along the bottom
for attaching the camo net. Use two of the screws and temporarily
attach both 12" pieces together. Using a power scroll or jigsaw,
cut out the teeth pattern for both pieces. Remove the screws and
sand the rough edges to remove splinters.
Now is a good time to paint the teeth. You can paint them anyway
you want. I painted the entire piece flat white to start, and once
dry, I used black spray paint to 'fill in' the center of the teeth
(see the photo). I finished off with red spray paint for gums.
One other thing I did was to cover the edges of the teeth with clear
silicone caulking to simulate drool or slime... A touch of yellow
spray paint over the (dry) caulking makes the silicone look nicely
gruesome.
|
|
|
Building the Braces
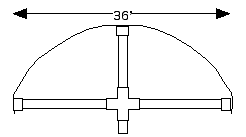
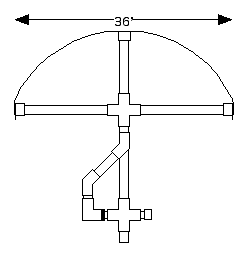
This will take a bit of trial and error. Decide how wide you want
the mouth. (This also sets the depth of the mouth). Start with about
a 36" and see if that looks good for you. The PVC bracing is
put together with a cross-tee in the center. Once you have estimated
the width, cut two pieces of 3/4" PVC and press into the cross-tee.
Don't glue anything yet! The great thing about using PVC is the
ability to press fit and evaluate how well the assembly is going.
Press on the pipe caps on the ends. Using scews, attach each end
of the teeth to the ends of the PVC caps. The luan will form an
arch. Cut a piece of PVC pipe to fit the front arch, press together
and screw in the front of the teeth. If you want a 'fatter' mouth,
make the front pipe shorter. A 'thinner' mouth will take a longer
piece. Note for a thin mouth (like an alligator or a T-rex), make
the side pieces shorter, too.
Once you have one set of teeth together, make up an identical set
of braces for the other set, and assemble (but don't glue yet!)
|

|
| Jaws
You now need to construct a hinge for the back of the mouth, so
the jaws can open and close. I build mine out of PVC fittings, but
most any method will work.
Place one set of teeth over the other to see how they fit. Use 45-degree
fittings to both lower the top pipe and allow spacing for the hinge.
Attach a cross tee to the bottom jaw. This is another trial and
error fitting process. Once the pipes are lined up, insert a 3/4"
to 1/2" adapter in the ell fitting, and push a piece of 1/2"
PVC through the cross tee. Attach a pipe cap to the 1/2" PVC.
Put a short piece of pipe through the back of the cross tee as a
push pipe (more on this later). Move the jaws up and down, and adjust
the pipes to get a smooth movement.
Once you have it all together and it moving correctly, follow the
directions on the cans, and sand, prime and glue all the pvc parts
together. If you wish , you can still delay gluing by screwing a
sheet rock screw through the fitting into the pipe. This will hold
the pipes solidly, even after final assembly.
Once the assembly is complete, open up the mouth on a table. Attach
some cloth or plastic to make the inside of the mouth, and hide
the mechanism. Most anything that covers the interior will work.
The 'victims' will only notice the teeth - and they won't stick
around long to critique your work!
|

|
| Hanging the Mouth
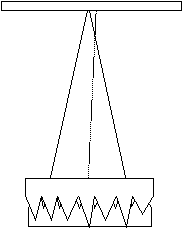
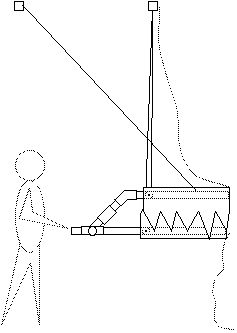
Next, find a place to put BigMouth. It requires a sturdy mounting
for the entire assembly. (I use 4'x8' plyood re-inforced with 2"x4"
on the back.
Screw two 2"x2"s across the top of the support structure,
one behind the operator, and the other where you want the front
of BigMouth to stay when at rest. Attach a loop of cord over the
center of the front 2x2. Tie one end to one side of the BOTTOM mouth
piece, and pull the mouth up, then attach the cord to the other
side. Don't worry about balance just yet.
Attach a cord to the center of the back 2x2, and the other end close
to the front of the TOP mouth piece.
The distance between the 2x2s overhead, and the placement of the
cord ends on the mouth is (yet another) trial and error process.
The mouth should sit (mostly) balanced.
Remember: The supporting cords need to be able to move freely.
The idea is that the whole assembly is self-supporting when its
at rest, and when you just push it forward, the mouth opens on its
own!
|
|
| Cover with Camo
Cut one piece of camo so that one piece covers from the floor to
the bottom of the mouth, and the other covers from the top 2x2 to
the top part of the mouth. Using one of the 4" strips, lay
the camo net along the 'gum' line, and screw in the 4" strip
to hold the camo net on. Refer to the drawing. Let the camo loop
around the 4" strip to hide it. The other end of the camo on
the bottom mouth piece can lay on the floor.
Attach the other end of the top camo piece to the top 2x2 using
screws. Leave a loop drooping down to cover the teeth when the mouth
is closed. When the mouth is pushed open, the camo slides back to
reveal the top teeth.
You may need to reposition the camo netting to get it right. |
| Attach camo to teeth using
the 4" strip and screws |

|

|
Leave a 'loop' of camo draping down in front
of teeth to hide them when waiting for victims.... |
|
Top of Mouth
|
|
Attach camo to teeth using
the 4" strip and screws |

|

|
Drape camo over strip and let hang loosely
to the floor. |
|
Bottom of Mouth
|
|
| Scare Somebody!
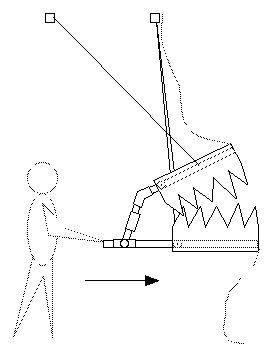
The great thing about the design is just how simple it is to operate.
All the operator needs to do is push the mouth forward. The back
cord opens the mouth automatically!
The way BigMouth is constructed gives the operator the ability to
make BigMouth jump out and move sideways, and by holding onto the
mouth, even twist it as it jumps out.
Be sure to keep the actor area behind BigMouth dark. The operator
only needs to wear dark clothes to remain invisible.
A nice, practiced roar adds to the action. |
|
|
|
====================
Alan Hopps shared an idea on the mouth construction:
I have a few ideas on big mouth, Why not make the teeth out of 1 or 2
inch sheet foam, that way you could sculpt your teeth with a soldering
iron. Paint them with elastomeric roof coating (its white and gives a
rubber coating) and them paint them as normal. these teeth would be guest
friendly and could safely bite people.
In Closing...
That's a quick overview how to build a great prop that's guaranteed to
make 'em jump everytime! Pay attention to the set around BigMouth to make
it appears part of the scenery. A table, alter, shelf or anything like
that will keep people from guessing that something is waiting to munch
on them. BigMouth has lots of flexibility. You can use most any cloth
or plastic for the 'body', and almost any setting to put it in, indoors
or outdoors. If you come up with any varitions or shortcuts, let us know.
Happy Boos!
Index
Back To Top
NOTE:
Before using any information here,
please read our Disclaimer.

Copyright
© 1995-2008 Myth Adventures, Inc.
All Rights Reserved
|


![]()


