The Giant Hand
I needed a cheap, light, 'monster' hand for a haunted house we built on
our driveway one Halloween. The orginal hand was about three feet from
fingertip to wrist. Its sturdy, very light and very easy to build. The
cost is about $15-$20 and takes about two hours to build, about an hour
to dry, and does not require any special painting or finishing - unless
you want to.
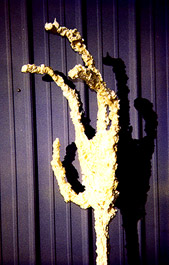
The Giant Hand
(sorry for the poor photo
quality - it really does look great!)
All the parts
are available at Home Depot (i.e., Haunter's Delight) or any home improvement
store. In addition to the parts below, you will need a pipe cutter (or
hack saw), some scrap cardboard or wood, and a well ventilated place to
glue and apply the foam.
Parts
3
ft |
1-1/4"
PVC pipe |
20
ft |
1/2" PVC
pipe |
8 |
1/2" 45 degree
connectors |
4 |
1/2" Tee
connectors |
1
can |
PVC cement |
1
roll |
Duct Tape |
1
can |
Expanding foam |
Construction
Building the hand
consists of three steps:
- Cutting and gluing the
PVC pipe
- Assembling and taping
the arm and hand together
- Covering the hand with
foam
Cutting and Gluing
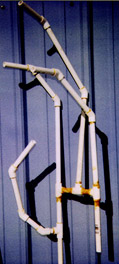 Use the photo as a guide to cut the pieces of PVC pipe
and insert each piece in to a pipe fitting. DO NOT GLUE ANYTHING together
just yet. You may want to make parts longer or shorter to fit your particular
need. Fit each finger together using the 45 degree fittings and pipe,
then connect the fingers together using the tees and short pieces of pipe.
Note how the thumb is attached by adding a short piece of pipe below the
finger attachment points. Also, be sure to add the piece of pipe below
the 'little finger'. This is used to form the palm when the hand is attached
to the arm pipe. Use the photo as a guide to cut the pieces of PVC pipe
and insert each piece in to a pipe fitting. DO NOT GLUE ANYTHING together
just yet. You may want to make parts longer or shorter to fit your particular
need. Fit each finger together using the 45 degree fittings and pipe,
then connect the fingers together using the tees and short pieces of pipe.
Note how the thumb is attached by adding a short piece of pipe below the
finger attachment points. Also, be sure to add the piece of pipe below
the 'little finger'. This is used to form the palm when the hand is attached
to the arm pipe.
Generally, the
distance from the first knuckle to the second is the longest piece, and
the third knuckle to the fingertip is the shortest. But, this IS a monster
hand, right? Use your imagination!
Once you get the
hand assembled, try moving the pieces around to pose the hand the way
you want it to appear. Once you have it the way you want it, you are ready
to glue it together.
WARNING:
Read and follow the instructions on the can very
carefully when using PVC cement.
This stuff is DANGEROUS if you are careless.
DO NOT breathe the vapors!
Only use it in a well ventilated area!
 Take each joint apart, glue it,
then re-assemble. By slowly gluing the hand together, you can retain the
pose you wanted. After the hand is glued together, set it aside. Take each joint apart, glue it,
then re-assemble. By slowly gluing the hand together, you can retain the
pose you wanted. After the hand is glued together, set it aside.
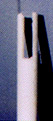
Using a saw, cut
a slot in the piece of 1 1/4" pipe large enough to fit over the 1/2"
pipe. Refer to the photo. The slot should be at least 4" long.
Assembling the
Hand
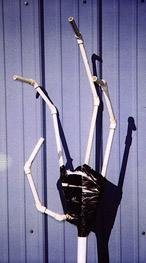 Here's the "fun" part. Slide the handle over the center of
the hand, and use a piece of duct tape to hold it in place. In order to
get the hand to look more realistic, the 'palm' portion must be pulled
together. Using the duct tape, wrap a piece around one side of the palm
and tape it to the arm pipe. Then using another piece, attach it to the
other side of the palm, then pull it until it touches the arm pipe. This
puts a great deal of strain on the pipe, but it is very strong and should
not split or break, but it does take quite a bit of pressure to pull the
ends together. Use as much tape as it takes to pull the palm together.
The arm pipe must be securely taped to the hand. Here's the "fun" part. Slide the handle over the center of
the hand, and use a piece of duct tape to hold it in place. In order to
get the hand to look more realistic, the 'palm' portion must be pulled
together. Using the duct tape, wrap a piece around one side of the palm
and tape it to the arm pipe. Then using another piece, attach it to the
other side of the palm, then pull it until it touches the arm pipe. This
puts a great deal of strain on the pipe, but it is very strong and should
not split or break, but it does take quite a bit of pressure to pull the
ends together. Use as much tape as it takes to pull the palm together.
The arm pipe must be securely taped to the hand.
Covering the Hand
Find a convient,
well ventilated place (outdoors is best!) to stand the hand securely upright.
Cover the area with newspaper or plastic to keep clean-up easy!
Starting at the
tips of the fingers, begin to lightly spray the foam directly on the pipe.
Cover the entire hand with foam. Don't worry how it looks when you first
put it on, this will change.
After the first
coat is done, wait about 10 minutes to allow the foam to expand and set.
The foam will begin to change from an off-white to yellowish color. This
is when the foam's consistency changes from from foamy to sticky. Use
a scrap piece of cardboard or wood to 'pull' the foam around the fingers
and palm. Working with the foam will cause it lose most of its volume,
but you will quickly see the texture change to a more 'skeletal' consistency.
Work with it a while, then add more layers of foam, let it expand, then
spread it. You can avoid spreading some places to let the foam expand
and form a 'skin'. The combination of expanded and spread out foam makes
the hand take on it monsterous appearance. Once you get it the way you
like it, let it sit for at least and hour to cure before painting the
hand.
Finishing
The texture and
color of the hand is great just the way it is, but you may want to paint
it to add an even scarier appearance. Solvents in oil-based paints may
disolve the foam, but latex-based paints work well.
Index
Back To Top
NOTE:
Before using any information here,
please read our Disclaimer.

Copyright
© 1995-2008 Myth Adventures, Inc.
All Rights Reserved
|